Backsplash Rescue in Sarasota: How a CTEF Certified Installer Fixed a Failed Tile Job
A Sarasota homeowner's kitchen backsplash was delaminating and cracking within 2 years. Here's how we rescued the project—and why certification matters.
The Call for Help
A Sarasota homeowner called us in late 2024 with a kitchen disaster. Large-format tile was falling off their walls—not just a few tiles, but an entire floor-to-ceiling installation across three walls of their kitchen, including the window surround. Less than 2 years after another contractor installed beautiful Calacatta-look porcelain, the tiles were dropping.
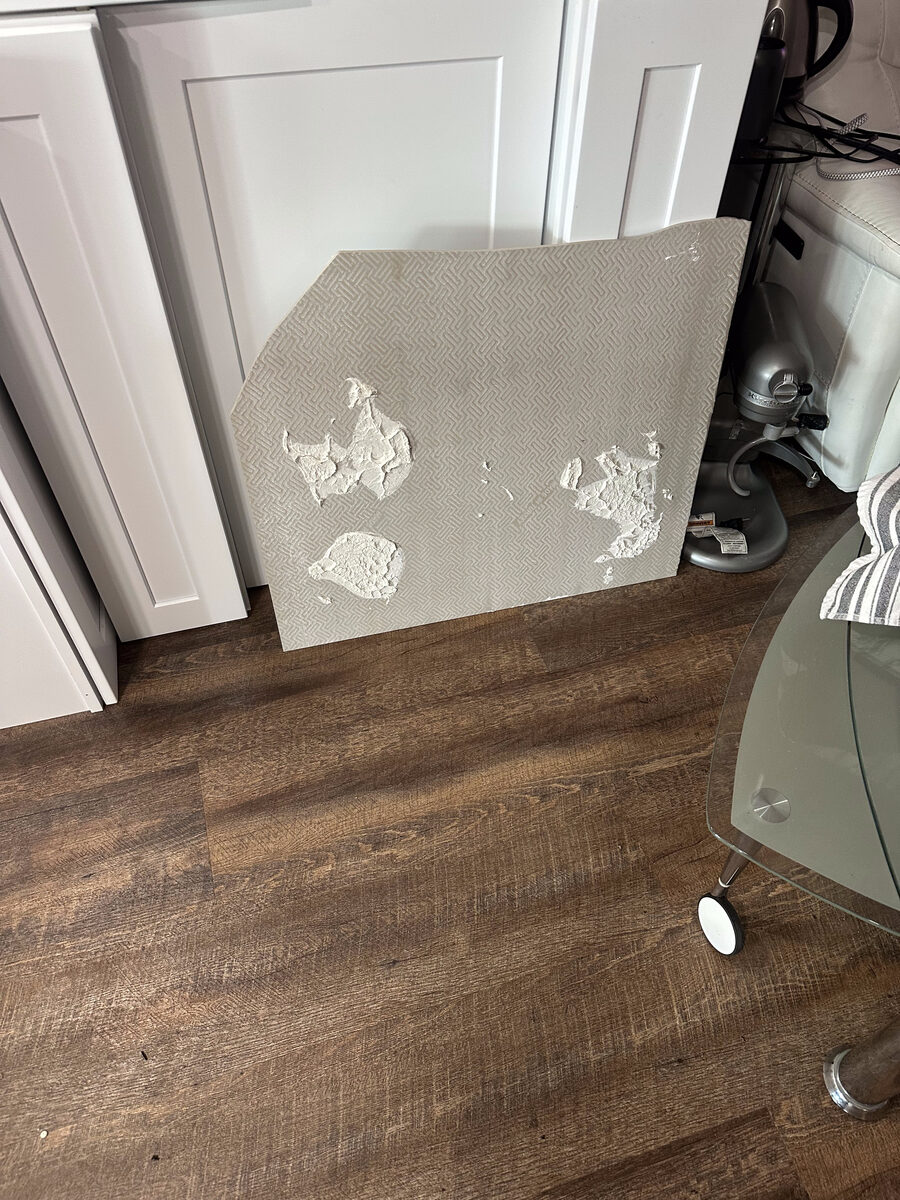
The homeowner was devastated. They'd invested in premium tile and a professional installation. When we arrived on site and examined the failed installation, we found the root cause: the original installer had used mastic (the wrong adhesive) and applied it with spot-bonding—just 4 to 5 small globs of adhesive on the back of each tile, covering less than 20% of the tile surface. TCNA standards require 95% minimum coverage.
"I want to know what went wrong," the homeowner said. "And this time, I want it done right." That's exactly what we delivered.
What Went Wrong: The Spot-Bonding Failure
The Before: Spot-Bonded Mastic Failure
Notice the tile back showing only 4-5 small adhesive globs—classic spot-bonding failure with less than 20% coverage. TCNA standards require 95% minimum.
Spot-Bonding with Mastic: The Fatal Combination
The original installer used two critical shortcuts at once: mastic (the wrong adhesive for kitchens) applied with spot-bonding (only a few globs instead of full coverage). The tile backs showed just 4 to 5 adhesive globs, covering less than 20% of the surface.
TCNA standards require 95% minimum adhesive coverage. Large-format tiles amplify this problem—the larger the tile, the more surface area needs support. With spot-bonding, 80% of each tile's back is empty air. Those tiles had almost nothing holding them to the wall.
Mastic: Wrong Adhesive for Kitchen Heat and Moisture
Mastic is a water-based, non-modified adhesive. It's cheap and easy to use, but it fails in kitchens where tiles encounter constant heat, moisture, and thermal expansion. Mastic softens in heat and loses grip over time. For large-format tile in a kitchen, it's a death sentence.
Result: Tiles Dropped Within 2 Years
The combination of spot-bonding and mastic meant the tiles had minimal contact with the wall and minimal grip. Kitchen heat weakened the mastic bond further. Within 24 months, gravity won. Tiles fell from an entire floor-to-ceiling wall.
How 1-L Tile Did It Right: The Solution
This was a complete kitchen transformation: floor-to-ceiling large-format Calacatta-look porcelain on three walls, including the window surround. We followed TCNA standards for large-format tile and kitchen installations. Here's how we rescued this project:
The Result: A Stunning, Lasting Transformation
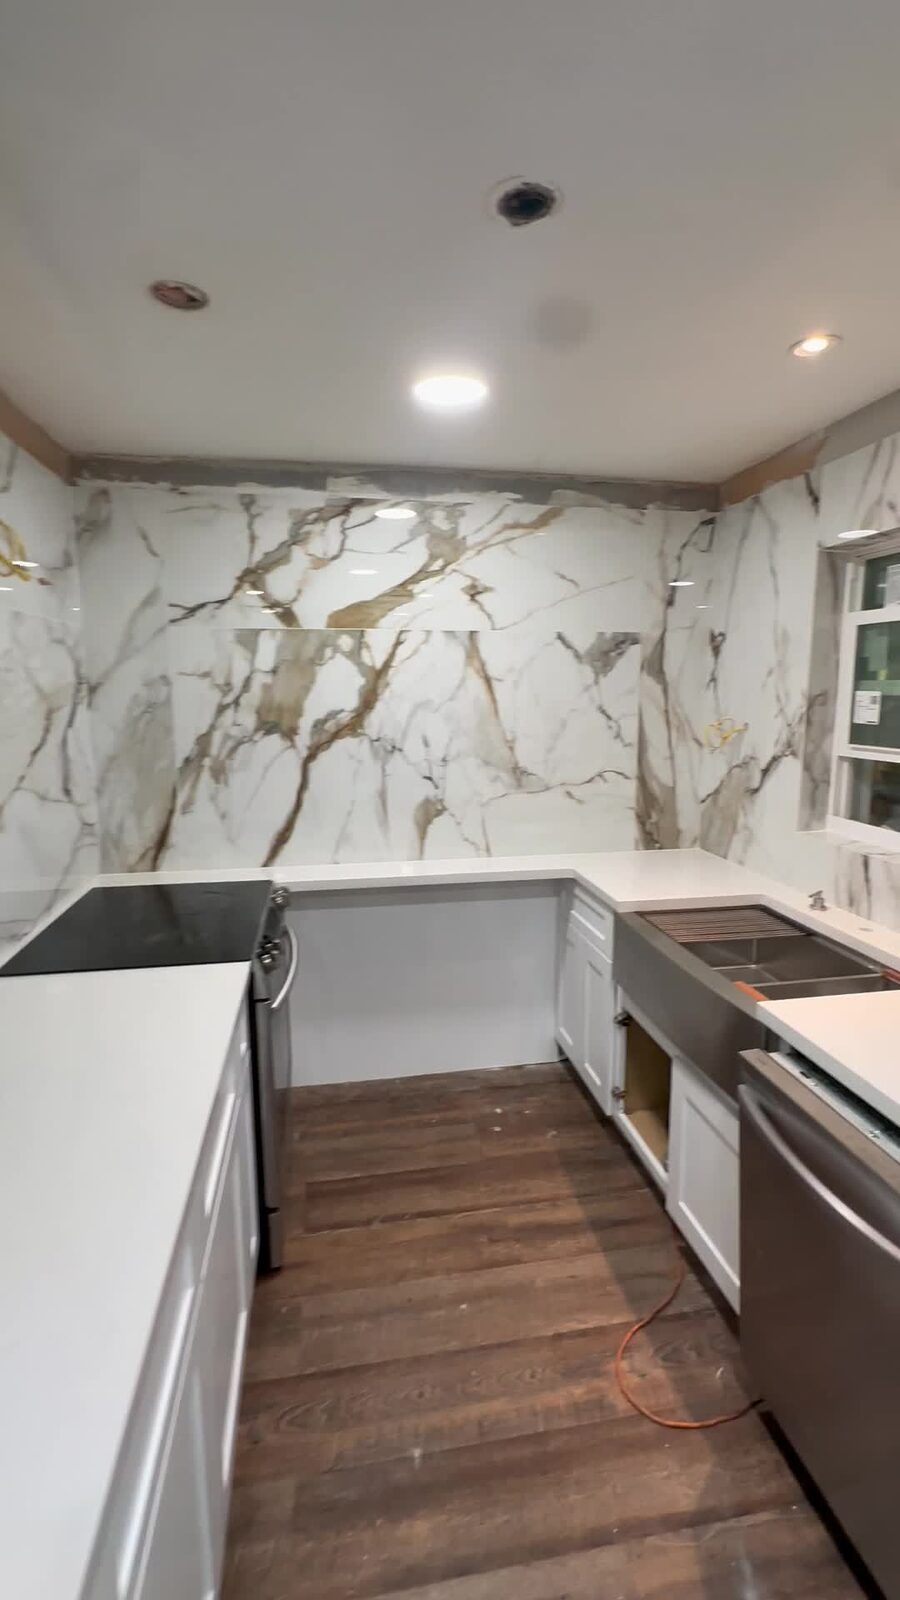
Floor-to-ceiling large-format Calacatta-look porcelain with white and gold/brown veining across three walls and the window surround. White cabinets, wood flooring, and stunning marble-look tile covering all three kitchen walls from counter to ceiling. The transformation is striking, and more importantly, it's installed to last 20+ years. No shortcuts. No spot-bonding. Just professional craftsmanship and TCNA-compliant installation.
The completed installation showcases the dramatic transformation from failed spot-bonded mastic to a premium, professionally installed Calacatta porcelain backsplash with 95%+ adhesive coverage and proper polymer-modified thinset.
Professional Craftsmanship Detail: 45-Degree Mitered Tile Edges
The window surround demanded precision. Rather than using metal trim or a basic edge profile, we cut each tile to a 45-degree angle where the wall tiles meet at the window edge. Two faces of tile converge in a seamless corner with no visible metal, no caulk lines, just clean geometry and professional masonry.
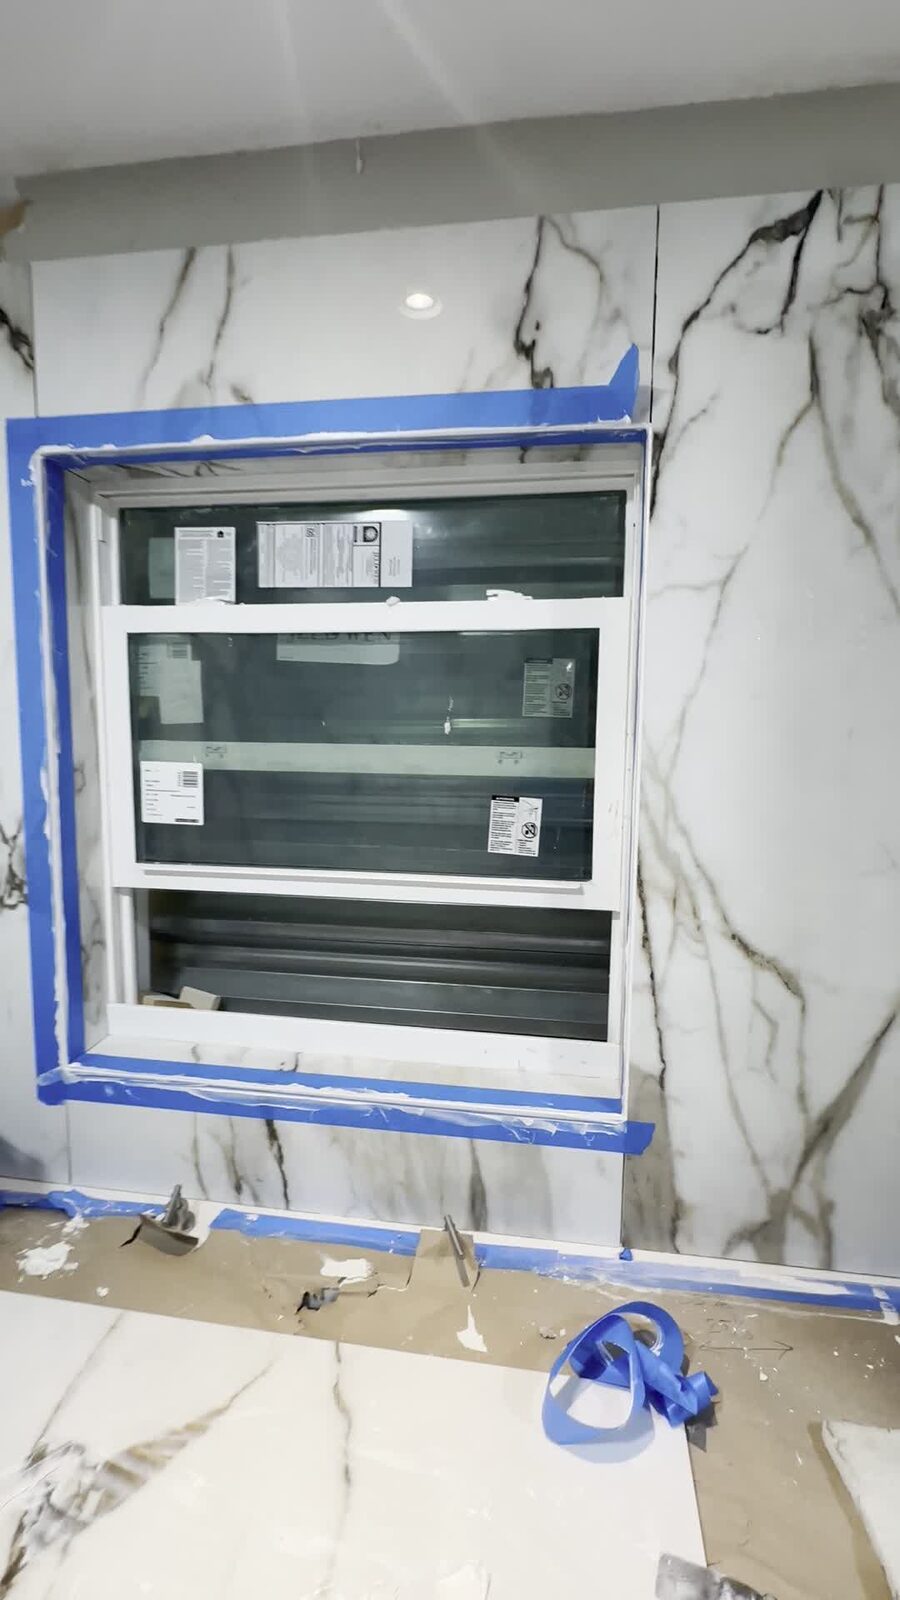
The mitered tile edge around this kitchen window — tile cut to 45 degrees, two faces meeting in a seamless corner with no metal trim.
Mitered tile edges are a hallmark of professional-grade installation. Most installers avoid them because they require:
Precision Cutting
Each tile must be cut to exactly 45 degrees using a wet saw. Sloppy cuts mean visible gaps or uneven lines at the corner.
Tight Spacing
The two mitered faces must fit flush with nearly invisible grout lines — usually 1/16" or less.
Careful Thinset
Mitered edges need careful mortar application to avoid showing through the tight joint or causing lippage.
Time & Skill
Mitering adds labor cost. Budget installers skip this detail and use metal trim or painted edge trim instead.
Why It Matters for This Installation
The window surround is a focal point in this kitchen. A metal edge or awkward trim would cheapen the look. Mitered corners elevate the entire installation — they communicate precision, care, and professional craftsmanship. This detail is one reason why TCNA-compliant installations cost more and last longer.
Why This Matters: The Real Cost of Shortcuts
The Homeowner's True Investment
This was a large-format tile installation: floor-to-ceiling across three walls and the window surround. Premium Calacatta-look porcelain. Substantial scope.
- Initial failed job: Cost unknown (underbid, failed fast)
- Rescue installation: Appropriate cost for premium tile + 3 walls + proper method
- Lesson learned: You get what you pay for. Cheap upfront = expensive later.
The original contractor's underbid price should have been a warning. Large-format tile, especially premium Calacatta porcelain on a 3-wall floor-to-ceiling installation, requires precision, expensive materials, and expertise. You can't cut corners on this scope—it will fail fast and expensively.
When you hire a CTEF Certified installer, you're investing in craftsmanship that lasts 20+ years. The shortcut approach? It lasted less than 2.
Why CTEF Certification Matters
The installer who rescued this backsplash holds the CTEF Certified Tile Installer (CTI) credential #1559. Here's why that credential matters:
What CTI Certification Means
- ✓ Passed rigorous exam on tile industry standards
- ✓ Knowledge of TCNA (Tile Council of North America) guidelines
- ✓ Proven hands-on experience with complex tile projects
- ✓ Continuing education to stay current with industry standards
Industry Reality
- ✗ Less than 10% of tile installers are CTEF certified
- ✗ Many "tile installers" have no formal training
- ✗ Certification is voluntary, not required by law
- ✗ Low price often signals lack of training, not bargain
How to verify CTEF certification: Visit ctef.com/find-a-cti and search by name or credential number. 1-L Tile's installer is listed as CTI #1559.
Backsplash Tile FAQs
1. Why Do Kitchen Backsplash Tiles Fall Off?
Backsplash tiles fail when installers use the wrong adhesive (mastic instead of thinset), apply insufficient mortar coverage, grout before the thinset cures, or skip substrate prep. Kitchen heat, moisture, and thermal expansion stress tiles constantly. Shortcuts fail fast in kitchens. The primary culprits are:
- • Wrong thinset: Mastic softens in heat and humidity
- • Low mortar coverage: Tiles have no grip (should be 95%+)
- • Grouting too soon: Thinset shifts while still setting
- • Dirty substrate: Paint, dust, and grime prevent adhesion
2. How Much Does Backsplash Repair Cost in Sarasota, FL?
Professional backsplash repair (full demo, substrate inspection, new installation) costs $400–$900 for a 30–50 sqft wall in Sarasota. The exact price depends on:
- • Size of the backsplash
- • Tile type (subway tile is faster than intricate mosaics)
- • Substrate condition (water damage or mold adds cost)
- • Grout sealer and special finishes
A typical 50 sqft kitchen backsplash rescue costs $650–$850 including materials. Call for a free on-site estimate: (941) 650-1222.
3. Can You Tile Over an Existing Backsplash?
No—full demo is recommended per TCNA standards. Tiling over an existing backsplash adds weight and can fail if:
- • The existing tiles are loose or damaged
- • The substrate underneath is compromised
- • Water has penetrated behind the original tiles
- • The adhesive bond is weak
Removing the old backsplash, inspecting the substrate, and starting fresh ensures a professional, long-lasting installation. It costs more upfront but prevents failures down the road.
4. What Is the Difference Between Mastic and Thinset?
Mastic: Water-based, non-modified adhesive. Easy to use, dries quickly, but fails in kitchens where heat and moisture are present. Mastic softens and loses grip over time.
Thinset (Polymer-Modified): Cement-based with polymers added. Flexes slightly, resists water and heat, and provides long-term durability. Required for kitchens, bathrooms, and wet areas per TCNA standards.
Bottom line: If an installer quotes mastic for your kitchen backsplash, find a different contractor. Mastic is the adhesive of short-term jobs; thinset is the adhesive of professional installations.
Ready to Rescue Your Kitchen Backsplash?
Don't let your backsplash fail like this Sarasota homeowner's. Get a free on-site estimate from a CTEF Certified installer. We'll assess the damage, show you what went wrong, and give you transparent pricing for a professional rescue.
Serving Sarasota, Venice, Bradenton, North Port, Siesta Key, and Lakewood Ranch